Using the Mayavi application
Tutorial examples to learn Mayavi
To get acquainted with mayavi you may start up the Mayavi2 application,
mayavi2 in the command line, like so:
$ mayavi2
On Windows you can double click on the installed mayavi2.exe
executable (usually in the Python2X\Scripts directory), or use the
start menu entry, if you installed python(x,y) or EPD.
Once Mayavi starts, you may resize the various panes of the user interface to get a comfortable layout. These settings will become the default “perspective” of the mayavi application. More details on the UI are available in the General layout of UI section.
We give a few detailed examples of how you can use the Mayavi application
to tour some of its features. Before proceeding to the examples, it can
be useful to locate some data to experiment with. Two of the examples
below make use of data shipped with the mayavi sources ship. These may
be found in the examples/data directory inside the root of the mayavi
source tree. If these are not installed, the sources may be downloaded
from here: https://github.com/enthought/mayavi
General layout of UI
When the mayavi2 application is started it will provide a user interface that looks something like the figure shown below.
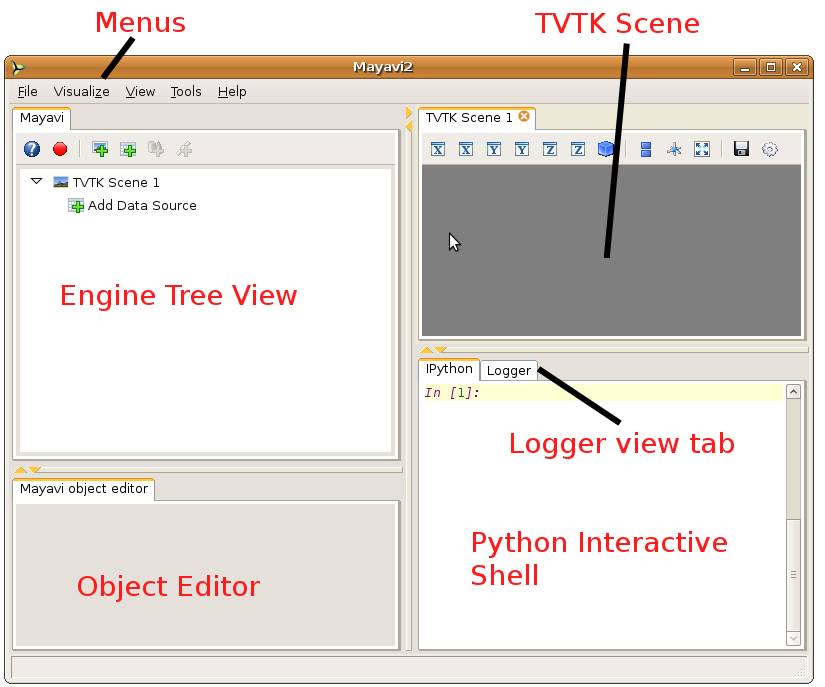
The UI features several sections described below.
- Menus:
The menus let you open files, load modules, set preferences etc.
- The Mayavi pipeline tree view:
- This is a tree view of the Mayavi pipeline.
Right click a tree node to rename, delete, copy the objects.
Left click on a node to edit its properties on the object editor below the tree.
It is possible to drag the nodes around on the tree. For example it is possible to drag and move a module from one set of Modules to another, or to move visualization from one scene to another.
- The object editor:
This is where the properties of Mayavi pipeline objects can be changed when an object on the pipeline is clicked.
- Mayavi scenes:
This is where the visualization of the data happens. One can interact with this scene via the mouse and the keyboard. More details are in the following sections.
- Python interpreter:
The built-in Python interpreter that can be used to script Mayavi and do other things. You can drag nodes from the Mayavi tree and drop them on the interpreter and then script the object represented by the node!
If you have version of IPython above 0.9.1 installed, this Python interpreter will use IPython.
- Logger:
Application log messages may be seen here.
Mayavi’s UI layout is highly configurable:
the line in-between the sections can be dragged to resize particular views.
most of the “tabs” on the widgets can be dragged around to move them anywhere in the application.
Each view area (the Mayavi pipeline view, object editor, python shell and logger) can be enabled and disabled in the ‘View’ menu.
Each time you change the appearance of Mayavi it is saved and the next time you start up the application it will have the same configuration. In addition, you can save different layouts into different “perspectives” using the View->Perspectives menu item.
Shown below is a specifically configured Mayavi user interface view. In this view the size of the various parts are changed.

Visualizing data
Visualization data in Mayavi is performed by loading some data as data sources, and applying visualization modules to these sources to visualize the data as described in the An overview of Mayavi section. To get a feeling of how this work, going through the Parametric surfaces example can be helpful.
One needs to have some data or the other loaded before a Module or Filter may be used. Mayavi supports several data file formats most notably VTK data file formats. Alternatively, mlab can be used to load data from numpy arrays. For advanced information on data structures, refer to the Data representation in Mayavi section.
Once data is loaded one can optionally use a variety of Filters to filter or modify the data in some way or the other and then visualize the data using several Modules.
Here we list all the Mayavi modules and filters. This list is useful as a reference:
Interaction with the scene
The Mayavi scenes on the UI can be closed by clicking on the little ‘x’ icon on the tab. Each scene features a toolbar that supports various features:
Buttons to set the view to view along the positive or negative X, Y and Z axes or obtain an isometric view.
A button to turn on parallel projection instead of the default perspective projection. This is particularly useful when one is looking at 2D plots.
A button to turn on an axes to indicate the x, y and z axes.
A button to turn on full-screen viewing. Note that once full-screen mode is entered one must press ‘q’ or ‘e’ to get back a normal window.
A button to save the scene to a variety of image formats. The image format to use is determined by the extension provided for the file.
A button that provides a UI to configure the scene properties.
The primary means to interact with the scene is to use the mouse and keyboard.
Mouse interaction
There are two modes of mouse interaction:
Camera mode: the default, where the camera is operated on with mouse moves. This mode is activated by pressing the ‘c’ key.
Actor mode: in this mode the mouse actions operate on the actor the mouse is currently above. This mode is activated by pressing the ‘a’ key.
The view on the scene can be changed by using various mouse actions. Usually these are accomplished by holding down a mouse button and dragging.
holding the left mouse button down and dragging will rotate the camera/actor in the direction moved.
Holding down “SHIFT” when doing this will pan the scene – just like the middle button.
Holding down “CONTROL” will rotate around the camera’s axis (roll).
Holding down “SHIFT” and “CONTROL” and dragging up will zoom in and dragging down will zoom out. This is like the right button.
holding the right mouse button down and dragging upwards will zoom in (or increase the actors scale) and dragging downwards will zoom out (or reduce scale).
holding the middle mouse button down and dragging will pan the scene or translate the object.
Rotating the mouse wheel upwards will zoom in and downwards will zoom out.
Keyboard interaction
The scene supports several features activated via keystrokes. These are:
- ‘3’:
Turn on/off stereo rendering. This may not work if the
‘stereo’ preference item is not set to True.
- ‘a’:
Use actor mode for mouse interaction instead of camera mode.
- ‘c’:
Use camera mode for mouse interaction instead of actor mode.
- ‘e’/’q’/’Esc’:
Exit full-screen mode.
- ‘f’:
Move camera’s focal point to current mouse location. This will move the camera focus to center the view at the current mouse position.
- ‘j’:
Use joystick mode for the mouse interaction. In joystick mode the mouse somewhat mimics a joystick. For example, holding the mouse left button down when away from the center will rotate the scene.
- ‘l’:
Configure the lights that are illumining the scene. This will pop-up a window to change the light configuration.
- ‘p’:
Pick the data at the current mouse point. This will pop-up a window with information on the current pick. The UI will also allow one to change the behavior of the picker to pick cells, points or arbitrary points.
- ‘r’:
Reset the camera focal point and position. This is very handy.
- ‘s’:
Save the scene to an image, this will first popup a file selection dialog box so you can choose the filename, the extension of the filename determines the image type.
- ‘t’:
Use trackball mode for the mouse interaction. This is the default mode for the mouse interaction.
- ‘=’/’+’:
Zoom in.
- ‘-’:
Zoom out.
- ‘left’/’right’/’up’/’down’ arrows:
Pressing the left, right, up and down arrow let you rotate the camera in those directions. When “SHIFT” modifier is also held down the camera is panned.
From interactive usage to scripting
It is easy to learn how to script Mayavi when using the interactive application. In this sub-section, we give a few tips for this purpose.
The embedded Python interpreter
The embedded Python interpreter offers extremely powerful possibilities. The interpreter features command completion, automatic documentation, tooltips and some multi-line editing. In addition it supports the following features:
The name
mayaviis automatically bound to themayavi.script.Scriptinstance. This may be used to easily script Mayavi.The name
applicationis bound to the envisage application.If a Python file is opened via the
File->Open File...menu item one can edit it with a color syntax capable editor. To execute this script in the embedded Python interpreter, the user may typeControl-ron the editor window. To save the file pressControl-s. This is a very handy feature when developing simple Mayavi scripts. You can also increase and decrease the font size usingControl-nandControl-s.As mentioned earlier, one may drag and drop nodes from the Mayavi pipeline tree view onto the Python shell. The object may then be scripted as one normally would. A commonly used pattern when this is done is the following:
>>> tvtk_scene_1
<mayavi.core.scene.Scene object at 0x9f4cbe3c>
>>> s = _
In this case the name
sis bound to the dropped tvtk_scene object. The_variable stores the last evaluated expression which is the dropped object. Usingtvtk_scene_1will also work but is a mouthful.
Recording Mayavi actions to a script
Mayavi features a very handy and powerful script recording facility. This can be used to:
record all actions performed on the Mayavi UI into a human readable, Python script that should be able to recreate your visualization.
learn how to script the Mayavi objects, in combination with mlab.
Here is how you can use this feature:
When you start the
mayavi2application, on the pipeline tree view toolbar you will find a red record icon next to the question mark icon. Click it. Note that this will also work from a standalone mlab session, on the toolbar of the Mayavi pipeline window.You’ll see a window popup with a few lines of boilerplate code so you can run your script standalone/with
mayavi2 -x script.py ``or
``python script.py
. Keep this window open and ignore for now theSave scriptbutton, which will be used when you are finished.Now do anything you please on the UI. As you perform those actions, the code needed to perform those actions is added to the code listing and displayed in the popup window. For example, create a new source (either via the adder node dialog/view, the file menu or right click, i.e. any normal option), then add a module/filter etc. Modify objects on the tree view.
Move the camera on the UI, rotate the camera, zoom, pan. All of these will generate suitable Python code. For the camera only the end position is stored (otherwise you’ll see millions of useless lines of code). The major keyboard actions on the scene are recorded (except for the ‘c’/’t’/’j’/’a’ keys). This implies that it will record any left/right/up/down arrows the ‘+’/’-’ keys etc.
Since the code is updated as the actions are performed, this is a nice way to learn the Mayavi API.
Once you are done, clicking on the record icon again will stop the recording: in the pop-up window, the
Recordingbox will be ticked off and no code corresponding to new actions will be displayed any more. If you want to save the recorded script to a Python file, click on theSave scriptbutton at the bottom of the window. Save the script to some file, sayscript.py. If you are only interested in the code and not saving a file you may click cancel at this point.Close the recorder window. You can quit Mayavi, if you want to.
Now from the shell do:
$ mayavi2 -x script.pyor even:
$ python script.pyThese should run all the code to get you where you left. You can feel free to edit this generated script – in fact that is the whole point of automatic script generation!
It is important to understand that it is possible to script an existing session of Mayavi too. So, if after starting Mayavi you did a few things or ran a Mayavi script and then want to record any further actions, that are certainly possible. Follow the same procedure as before. The only gotcha you have to remember in this case is that the script recorder will not create the objects you already have setup on the session.
Note
You should also be able to delete/drag drop objects on the Mayavi tree view. However, these probably aren’t things you’d want to do in an automatic script.
As noted earlier, script recording will work for a mlab session or
anywhere else where Mayavi is used. It will not generate any mlab
specific code but write generic Mayavi code using the OO Mayavi API.
Warning
Limitations
The script recorder works for some important actions. At this point it does not support the following actions:
- On the scene, the ‘c’/’t’/’j’/’a’/’p’ keys are not recorded
correctly since this is much more complicated to implement and typically not necessary for basic scripting.
- Arbitrary scripting of the interface is obviously not going to work
as you may expect.
- Only trait changes and specific calls are recorded explicitly in the
code. So calling arbitrary methods on arbitrary Mayavi objects will not record anything typically.
Command line arguments
The mayavi2 application features several useful command line
arguments that are described in the following section. These options
are described in the mayavi2 man page as well.
A complete pipeline may be built from the command line, so that Mayavi can be integrated in shell scripts to provide useful visualizations.
Mayavi can be run like so:
mayavi2 [options] [args]
Where arg1, arg2 etc. are optional file names that correspond
to saved Mayavi2 visualizations (filename.mv2), Mayavi2 scripts
(filename.py) or any datafile supported by Mayavi. If no options or
arguments are provided Mayavi will start up with a default blank scene.
The options are:
- -h
This prints all the available command line options and exits. Also available through
--help.- -V
This prints the Mayavi version on the command line and exits. Also available through
--version.- -z file_name
This loads a previously saved Mayavi2 visualization. Also available through
--viz file_nameor--visualization file_name.- -d data_file
Opens any of the supported data file formats or non-file associated data source objects. This includes VTK file formats (
*.vtk,*.xml,*.vt[i,p,r,s,u],*.pvt[i,p,r,s,u]), VRML2 (*.wrl), 3D Studio (*.3ds), PLOT3D (*.xyz), STL, BYU, RAW, PLY, PDB, SLC, FACET, OBJ, AVSUCD (*.inp), GAMBIT (*.neu), Exodus (*.exii), PNG, JPEG, BMP, PNM, DCM, DEM, MHA, MHD, MINC, XIMG, TIFF, and various others that are supported.Note that
data_filecan also be a source object not associated with a file, for exampleParametricSurfaceorPointLoadwill load the corresponding data sources into Mayavi. Also available through--data.- -m module-name
A module is an object that actually visualizes the data. The given
module-nameis loaded in the currentModuleManager. The module name must be a valid one if not you will get an error message.If a module is specified as
package.sub.module.SomeModulethen the module (SomeModule) is imported frompackage.sub.module. Standard modules provided withmayavi2do not need the full path specification. For example:mayavi2 -d data.vtk -m Outline -m user_modules.AModule
In this example
Outlineis a standard module anduser_modules.AModuleis some user defined module. Also available through--module.- -f filter-name
A filter is an object that filters out the data in some way or the other. The given
filter-nameis loaded with respect to the current source/filter object. The filter name must be a valid one if not you will get an error message.If the filter is specified as
package.sub.filter.SomeFilterthen the filter (SomeFilter) is imported frompackage.sub.filter. Standard modules provided withmayavi2do not need the full path specification. For example:mayavi2 -d data.vtk -f ExtractVectorNorm -f user_filters.AFilter
In this example
ExtractVectorNormis a standard filter anduser_filters.AFilteris some user defined filter. Also available through--filter.- -M
Starts up a new module manager on the Mayavi pipeline. Also available through
--module-mgr.- -n
Creates a new window/scene. Any options passed after this will apply to this newly created scene. Also available through
--new-window.- -o
Run Mayavi in off-screen mode without any graphical user interface. This is most useful for scripts that need to render images off-screen (for an animation say) in the background without an intrusive user interface popping up. Mayavi scripts (run via the
-xargument) should typically work fine in this mode. Also available through,--off-screen.- -x script-file
This executes the given script in a namespace where we guarantee that the name ‘mayavi’ is Mayavi’s script instance – just like in the embedded Python interpreter. Also available through
--exec.- -t
Runs the Mayavi test suite and exits. If run as such, this runs both the TVTK and Mayavi2 unit tests. If any additional arguments are passed they are passed along to the test runner. So this may be used to run other tests as well. For example:
mayavi2 -t apptools.persistence
This will run just the tests inside the
apptools.persistencepackage. You can also specify a directory with test files to run with this, for example:mayavi2 -t relative_path_to/integrationtests/mayavi
will run the integration tests from the Mayavi sources. Also available as
--test.- -s python-expression
Execute the python-expression on the last created object. For example, let’s say the previous object was a module. If you want to set the color of that object and save the scene, you may do:
$ mayavi2 [...] -m Outline -s"actor.property.color = (1,0,0)" \
 -s "scene.save('test.png', size=(800, 800))"
You should use quotes for the expression. This is also available through
--set.
Warning
Note that -x or --exec uses execfile, so this can be
dangerous if the script does something nasty! Similarly, -s or
--set uses exec, which can also be dangerous if abused.
It is important to note that Mayavi’s command line arguments are processed sequentially in the same order they are given. This allows users to do interesting things.
Here are a few examples of the command line arguments:
$ mayavi2 -d ParametricSurface -s "function='dini'" -m Surface \
  -s "module_manager.scalar_lut_manager.show_scalar_bar = True" \
  -s "scene.isometric_view()" -s "scene.save('snapshot.png')"

$ mayavi2 -d heart.vtk -m Axes -m Outline -m GridPlane \
  -m ContourGridPlane -m IsoSurface

$ mayavi2 -d fire_ug.vtu -m Axes -m Outline -m VectorCutPlane \
  -f MaskPoints -m Glyph
In the above examples, heart.vtk and fire_ug.vtu VTK files can
be found in the examples/data directory in the source. They may
also be installed on your computer depending on your particular
platform.