Building applications using Mayavi
Mayavi can be used as a fully integrated and interactive 3D plotting tool in a GUI application. Using the event model behind Traits and TVTK, all the different properties of a visualization can be changed dynamically, including the data visualized itself.
In this section, we first show how an interactive dialog embedding a Mayavi scene can be built, using Traits. Then we show how to integrate this dialog in a WxPython or a PyQt (or PySide) application.
Custom interactive dialogs
Mayavi and TVTK are entirely built using the Traits library which provides easy callbacks and visualization for objects attribute. All the different properties of the pipeline and pipeline objects are expressed as Traits, i.e. special attributes that can be visualized in dialogs and that fire callbacks when they are modified. In particular this means that when a visualization object is modified, the scene can update automatically.
We strongly suggest that you refer to the Traits documentation for more details. There are also a list of introductory materials <https://support.enthought.com/hc/en-us/articles/204469620-Introductory-materials-for-Traits-and-Traits-UI> for learning Traits and Traits UI.
Embedding a Mayavi scene in a Traits dialog
To build a custom dialog with a Mayavi scene, the best option is to create a class deriving from the base Traits class. A special attribute, called SceneModel can be used as an attribute to represent a Mayavi scene that can accept objects. This defines the model, i.e. the main HasTraits object in which the application logics is contained.
A view of this object, as a dialog, can be created using the .configure_traits method of this object. If a view is explicitly specified the embedded Mayavi scene can be represented with the usual widget for scene by specifying for it the SceneEditor:
from traits.api import HasTraits, Instance
from traitsui.api import View, Item
from tvtk.pyface.scene_model import SceneModel
from tvtk.pyface.scene_editor import SceneEditor

class MyModel(HasTraits):
    scene = Instance(SceneModel, ())

    view = View(Item('scene', height=400, show_label=False,
                    editor=SceneEditor()))

MyModel().configure_traits()
A Mayavi button to pop up the pipeline dialog can be added on the toolbar by specifying a different scene view to the SceneEditor:
from mayavi.core.ui.mayavi_scene import MayaviScene

#...
editor=SceneEditor(scene_class=MayaviScene)
#...
If, on the contrary, you want a view with no toolbar, you can replace the MayaviView by a raw tvtk view:
from tvtk.pyface.api import Scene

#...
editor=SceneEditor(scene_class=Scene)
#...
The Mayavi traits ui example is a fairly comprehensive example that demonstrates how you can embed almost the entire Mayavi UI into your traits based UI.
A scene, with mlab embedded
An object representing a scene is interesting only if you can visualize data with the scene. For this we can instanciate an Engine and assign it to the scene. Having an Engine only for one scene allows us to confine action and visualization objects only to this scene.
We can also use an MlabSceneModel instance, rather than a SceneModel, imported from mayavi.tools.mlab_scene_model. This scene model registers the figure in mlab (mlab:用Python脚本进行3D绘图). It has an embedded mlab attribute, that exposes the mlab commands (see 关于numpy数组的3D可视化). For instance plotting 3D points can be achieved with self.scene.mlab.points3d(x, y, z, s).
警告
Embedding several scenes in an application
When using several ‘MlabSceneModel’ in an application, there is an ambiguity regarding which scene mlab should use to plot to. This is why relying on using the current figure, as mlab most often does, is dangerous.
The solution to this, is explicitly pass in the Mayavi figure to mlab’s figure keyword argument:
mlab.points3d(x, y, z, s, figure=self.scene.mayavi_scene)
However, this functionality is new in Mayavi 3.2.1.
A full example with two embedded scenes is given on Multiple mlab scene models example.
Another way of creating isolation between scene is to explicitly insert them in different engines. This is demonstrated in Multiple engines example
Making the visualization live
Having an interactive application is interesting only if you can do custom, domain-specific, interaction with the visualization.
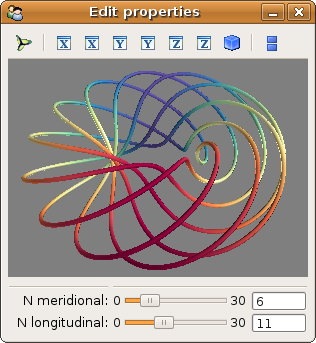
An important use case is modifying the data visualized as a parameter is changed interactively. For this we can use the inplace modification of the data of an mlab object, as for animation of an mlab plot (see 将数据做成动画). Suppose we are plotting a line curve defined by a function of two parameters:
from numpy import linspace, pi, cos, sin

def curve(n_mer, n_long):
    phi = linspace(0, 2*pi, 2000)
    return [ cos(phi*n_mer) * (1 + 0.5*cos(n_long*phi)),
            sin(phi*n_mer) * (1 + 0.5*cos(n_long*phi)),
            0.5*sin(n_long*phi),
            sin(phi*n_mer)]
Using mlab, we could plot the curve with plot3d:
x, y, z, s = curve(4, 6)
from mayavi import mlab
plot = mlab.plot3d(x, y, z, s)
Modifying the plot for new parameters could be written:
x, y, z, t = curve(4, 8)
plot.mlab_source.trait_set(x=x, y=y, z=z, scalars=t)
In a dialog, this would be:
from traits.api import HasTraits, Range, Instance, \
                    on_trait_change
from traitsui.api import View, Item, HGroup
from tvtk.pyface.scene_editor import SceneEditor
from mayavi.tools.mlab_scene_model import \
                    MlabSceneModel
from mayavi.core.ui.mayavi_scene import MayaviScene


class Visualization(HasTraits):
    meridional = Range(1, 30,  6)
    transverse = Range(0, 30, 11)
    scene      = Instance(MlabSceneModel, ())

    def __init__(self):
        # Do not forget to call the parent's __init__
        HasTraits.__init__(self)
        x, y, z, t = curve(self.meridional, self.transverse)
        self.plot = self.scene.mlab.plot3d(x, y, z, t, colormap='Spectral')

    @on_trait_change('meridional,transverse')
    def update_plot(self):
        x, y, z, t = curve(self.meridional, self.transverse)
        self.plot.mlab_source.trait_set(x=x, y=y, z=z, scalars=t)


    # the layout of the dialog created
    view = View(Item('scene', editor=SceneEditor(scene_class=MayaviScene),
                    height=250, width=300, show_label=False),
                HGroup(
                        '_', 'meridional', 'transverse',
                    ),
                )

visualization = Visualization()
visualization.configure_traits()
This code creates the following dialog:
A complete, runnable, code based on the above comments is given in the Mlab interactive dialog example.
警告
Visualization objects and properties created before a scene is available
When creating a traited object with an embedded scene, the scene can be created and populated before a view on it is actually open. However, some VTK objects or properties require a scene with a camera and interaction to be open to work properly, mainly because either they orient themselves to the camera, or deal with interaction with keyboard or mouse (such as interactors, eg an implicit plane). As a result some property changes on VTK objects will raise warnings or simply not work when applied without a dialog opened. When embedding a scene in a Traits object, the best option is to create and modify these objects only when the scene is activated, by listening to changes on the ‘scene.activated’ traits:
@on_trait_change('scene.activated')
def create_plot(self):
    # Do the plotting here
    # ...
The Lorenz ui example shows a good example of this situation.
Integrating in a WxPython application
Using the Visualization class defined above:
import wx

class MainWindow(wx.Frame):
    def __init__(self, parent, id):
        wx.Frame.__init__(self, parent, id, 'Mayavi in Wx')
        self.visualization = Visualization()
        self.control = self.visualization.edit_traits(parent=self,
                                kind='subpanel').control
        self.Show()

app = wx.App(False)
frame = MainWindow(None, wx.ID_ANY)
app.MainLoop()
Two examples of integrating Mayavi visualization with Wx applications are given:
Wx embedding example: a simple example, as above.
Wx mayavi embed in notebook example: a more complexe example, showing 2 different Mayavi views embedded in a Wx notebook.
Integrating in a Qt application
Mayavi dialogs can also be integrated in a PyQt or PySide application.
Before defining the Visualization class, you should set the toolkit used by Traits to the Qt backend:
import os
os.environ['ETS_TOOLKIT'] = 'qt4'
Also, as Traits runs with PyQt and PySide, if you use PyQt, you must make sure that you switch its binding in a mode that is compatible with PySide (internal string representation mode), before you import any PyQt code:
import sip
sip.setapi('QString', 2)
By default, with modern versions of the Enthought Tool Suite, Traits will use PySide. To force the use of PyQt, you must set the QT_API environment variable:
os.environ['QT_API'] = 'pyqt'
Then using the visualization class defined above:
from PyQt4 import QtGui

class MainWindow(QtGui.QMainWindow):
    def __init__(self, parent=None):
        QtGui.QWidget.__init__(self, parent)
        self.visualization = Visualization()
        self.ui = self.visualization.edit_traits().control
        self.setCentralWidget(self.ui)

window = MainWindow()
window.show()
QtGui.qApp.exec_()
For a full-blown example of embedding in Qt, see Qt embedding example.
警告
On definition of the model (and thus previous to the start of the event loop), Traits sets up some hooks on the main QApplication. As a result if you instanciate a new one, using for instance:
app = QtGui.QApplication()
Your Traits application will not work.